How to Use Font Awesome CSS on Your Website?
If you’re in the market for a new web font, consider trying Font Awesome. This icon set is lightweight, scalable, and accessible. It’s also CSS-compatible, so you can customize the look of each icon with ease.
Learn more about Font Awesome in this article. After all, there are more reasons to use this font than just its slick looks. Use it on your website and you’ll be glad you did.
Icons are scalable:
If you are unsure about whether Font Awesome CSS icons are scalable, you should know that they are! In fact, they are so scalable that they are able to be magnified up to five times their original size. This will allow you to use them on any size web page without sacrificing usability.
In addition to being scalable, Font Awesome icons look great on high-resolution displays. And, you don’t have to download or install any scripts in order to use them! While some icons are scalable, others aren’t. Since Font Awesome is built on a grid, all icons share a consistent height.
However, they may vary in width. Adding the Font Awesome CSS property to your stylesheet will make all icons the same width. That way, you can customize them to fit any size web page or mobile device. You can also use CSS to modify the font’s size.
Lightweight:
You can use Font Awesome on your website and your mobile app. This font-based technology is supported by most modern browsers and is extremely lightweight. Font Awesome comes in 6 different file formats: otf, ttf, woff, and CSS. All of them are supported by browsers and mobile devices. In fact, the WOFF2 file format is the smallest file size of them all.
If you are unsure of what Font Awesome is and how it works, you can check out the Font Awesome cheatsheet. You can add this font to your page by following a few simple steps. First, install the Font Awesome font on your browser. It will work with plain CSS, too. If you have an old version of the font, it will probably not work. If you aren’t sure if it will work on your website, download the free version and try it out.
Accessible:
The fa-accessible-icon CSS property allows you to use a border for an accessible icon. In addition to adding a border, you can use it to make it pull to the left or right. You can also use a spin class to make the icon spin. And if you want your icon to be animated, you can use the fa-pulse icon.
In either case, you can use the fa-spin CSS property to make it appear in the animation. The CSS property aria-hidden-true disables assistive technologies from detecting font icons. By default, screen readers ignore font icon characters, but there are CSS properties you can use to make them accessible to screen readers.
The following examples show how you can make your icon accessible to screen readers. They will be rendered with the Aria-hidden-true attribute. You can use this property to hide the font icon character from assistive technologies.
Can be customized with CSS:
If you are interested in modifying the appearance of your website using Font Awesome CSS, there are several ways to do so. One way is to add the font awesome-SVG-core to your theme. This adds the icon to your theme’s CSS stylesheet. Once added, this font can be customized as needed.
To see how to do this, visit the official website. There are a lot of resources that you can find online. Font Awesome is an icon set that includes hundreds of scalable vector icons for a variety of topics and content. You can customize their size, color, and shadow using CSS.
The icons are free for commercial use and can be customized using CSS. In addition to CSS, you can also customize the icons using the SIL OFL 1.1, MIT License, or CC BY 3.0. To download and use Font Awesome, you must have an account on the official site.
Installed:
- Once you’ve downloaded and installed Font Awesome, you’ll need to manage it correctly.
- For example, to add icons to your website, you’ll need to reference the Font Awesome file in your project’s CSS.
- Once you’ve referenced Font Awesome, you can use it in templates and pages.
- But to use it correctly, you need to add the right CSS classes.
This article will show you how to install and configure Font Awesome in WordPress.
- The first step in installing Font Awesome is to sign up for a free account.
- You’ll be asked for some personal information, but you can skip it if you prefer not to.
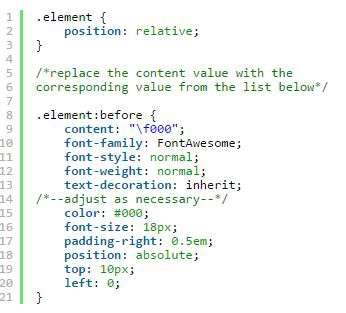
- Next, you’ll be given the font’s custom CSS code, which you should paste between the head and body tags of your website.
- Then, you’re ready to use it. Creating a new blog with Font Awesome is simple and quick.
Troubleshooting:
If you’re using Font Awesome, but are experiencing problems, you’ve probably already visited the Font Amazing wiki. A recent update to the CSS library resolved a conflict that was causing your site to display different versions of fonts.
To resolve this issue, you need to make sure that your website is loading the most recent version. This may not always be the case, and you should also check your browser’s compatibility before making any changes.
Download Link:
If you’ve made the change and it’s still not working, it’s likely a server configuration issue. The best solution is to check your hosting provider’s CORS configuration, which enables the use of fonts from other sources.
After enabling CORS, enable Font Awesome on your website by going to X/Pro > Theme Options >> Miscellaneous. You can also set different font styles for your site’s fonts, including a mix of bold and italic.


